 Check Accessibility, HTML, CSS, Broken Links & Spelling
Documentation > Main options
The main options may be selected here.

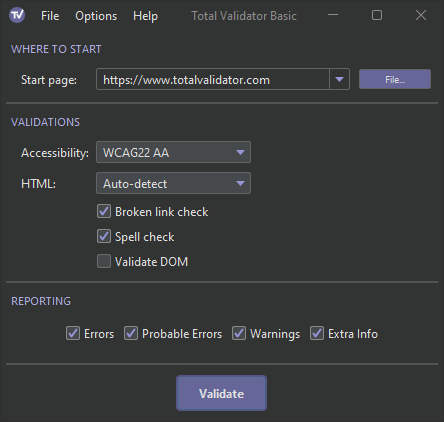

Start page
This is the page Total Validator will try to test. It can either be a URL or a reference to a local file (or folder with the Pro version)
You can enter a full URL such as https://totalvalidator.com. But if you enter just totalvalidator it will try to complete the URL by adding https:// to the start and .com to the end.
If you are testing a local web page then you can either type in (or cut and paste)
the path to the page, or use the File button to select the page you want to test.
With the Pro version Total Validator will start at this page and then follow every link on the same website/filesystem, testing each page it finds.
You can also select a local folder and, in addition to links to local pages, Total Validator will test every page
(files ending with: .htm, .html, .xhtml, .xht, and .css only) within this and all sub-folders.
As it may follow links to other parts of the filesystem, you may wish to use the Only follow below option to restrict this.
Use the Reset List menu option on the File menu to clear the
drop-down list of recent entries.
Accessibility validation
Select this option if you wish to test each page against the W3C Web Accessibility Guidelines or US Section 508.
For the WCAG guidelines, there are three levels to choose from : A, AA and AAA. Selecting AA
will also perform all of the A tests, and selecting AAA will perform all the AA and A tests.
You can also choose between US Section 508
(which is the same as selecting WCAG 2.2 AA), or US Section 508 (2001) to run the pre-2017 tests.
For your convenience, selecting WCAG 2.2, WCAG 2.1, WCAG 2.0 or Section 508 will automatically perform ARIA and CSS accessibility tests,
even if you have not selected a HTML validation (where ARIA is normally tested) or a CSS validation. With the Pro version this
also means testing CSS pages, but you can opt out of this using the CSS Pages option.
You may also wish to read our Accessibility FAQ, where we advise using the HTML, CSS, Spell check and Validate DOM options for a comprehensive accessibility test.
CSS Pages (Pro only)
If you select WCAG 2.2, WCAG 2.1, WCAG 2.0 or Section 508, then CSS pages will be accessibility tested, even if you have not selected
a CSS validation. If you wish to ignore CSS pages altogether, then uncheck this option.
Note that <style> elements and style attributes on HTML pages will still be tested for accessibility issues.
HTML validation
Select the specification you wish to test against from the drop down. Select the blank option if you do not wish to perform a HTML test.
The Auto-detect option is normally the best option to select as this uses the <!DOCTYPE>
declaration on each page to determine what specification to check against. If the <!DOCTYPE> is missing
or unrecognised a best-fit algorithm will calculate the option that produces the fewest
errors and will test against that instead.
The Best-fit option ignores any existing <!DOCTYPE> and uses
the DTD that produces the fewest errors. This is a useful way of determining the
best <!DOCTYPE> to use on any page.
As HTML5 is continuously being improved, selecting HTML5 or XHTML5 will use the latest WHATWG HTML Standard at the time Total Validator is built.
CSS validation (Pro only)
Select the CSS level you wish to test against from the drop down, or select the blank option if you do not wish to test any CSS.
This option allows you to test the contents of <style> tags,
style attributes and style sheets against the selected W3C standard.
If you do not select this option then the contents of <style> tags will
not appear on the page reports, external style sheets will not be read,
and any embedded links within <style> tags, style attributes and style sheets
will not be tested, or followed. Several accessibility tests will also not run.
Ignore vendor (Pro only)
Normally CSS vendor extensions such as -moz-box-shadow
will raise a warning, but will still be tested against the chosen CSS level.
But some vendor extensions do not conform to the latest specifications and may
also report an error.
With the ignore vendor option any vendor extension will be ignored completely
so that no warnings or errors are reported.
Broken link check
If you choose this option (selected by default) Total Validator will test each link to ensure that it isn't broken. But note that we ignore any links in JavaScript.
Links to all resources such as CSS files, images, and scripts are tested as well as links to other web pages. Note that testing links can often be a time consuming process, especially if there are broken links on the pages, and especially if you are testing more than one page, so please be patient. However, use of the timeout and concurrency options may help speed things up.
Links within <style> tags, style attributes and style sheets are only
tested if you select a CSS validation.
If you are testing a local file then you may find many broken links on the page reports. This is because relative links will be followed as if they are local files on your computer, so if you don't have the file the link will appear broken. Similarly, absolute URLs will be tested, and these may appear broken if you are working off-line or the URLs are inaccessible for any reason.
Spell check
Select this option if you wish to test the content of a page for spelling mistakes. It will use the language codes on web pages to detect the languages used and can check against an English dictionary of over 150,000 words, French of over 130,000 words, Spanish of over 85,000 words, German of over 160,000 words, and Italian of over 60,000 words.
You can also include additional words that are not found in the supplied dictionaries, or use your own alternative dictionary for these or other languages using the Spell Check options. See the dedicated Spell checking page for details on how best to use this option.
Note that when you use the Spell check option it may take substantially longer to test each
web page.
Validate DOM
Normally Total Validator tests the web page before any JavaScript has been run. If your page uses JavaScript to modify the page, then use this option to test the page after any initial JavaScript has run.
It also allows us to perform additional accessibility tests such as contrast testing, and so should be used when a more comprehensive accessibility test is required.
This option works in combination with our browser extensions, so you must have one installed in your default or selected browser for this option to work.
When you start a test run, it begins by opening the Start page in your browser, waits for the JavaScript to run, then sends the browser DOM back to the application on the listen port to test. The results will then be displayed in the same browser tab.
During the process Total Validator will automatically minimise or shrink to the System Tray to keep it out of the way.
With Total Validator Pro and CI you can test multiple pages, or an entire site this way. In this case your browser will automatically move between each page on the site, before finally displaying the results.
Because what is being tested is not a 'real' web page, but is generated from your browser's DOM, you may see some issues that do not exist in the original web page, and line numbers will often differ. Also note that broken links can only be tested if you have the Pro or CI version.
Note that you cannot test local pages using this option, due to browser security restrictions.
So the Start page must begin with http:// or https://.
As an alternative, you can manually load the local page into your browser, and then start the test from the browser extension.
Reporting (Basic only)
There are four types of issue which may be reported:
- Errors: These are core violations of one of the tests you have selected.
- Probable Errors: These are issues which should only be ignored if a solution has been explicitly provided.
- Warnings: These are either potential errors, or issues worth addressing to improve pages.
- Extra Info: This is additional guidance, often where a manual check is recommended.
For further information and alternative ways of ignoring issues, see the Ignoring issues topic
Validate button
This will start the testing process. At the end of the process your default browser should be launched displaying the results.
During the testing process you can use the Cancel button to stop the process. Note that this may take a while to respond when testing broken links.